

Follow Edgar M Downs for more
This is the first true monster DIY I've done on my E46. It took me 7 grueling days on my own to complete. The idea of this DIY is to show you how you can do it in less time and with less headache, if you choose to do it. The end result is worth it and you can tackle other projects such as fixing door leaky seal/rattling issues and window regulators whiles attempting this DIY.
TIPS:
- I found it best starting with the drivers door first, rear doors next and finishing up on the front passenger door. This insured that the hardest door was done and out the way first. You do not want to start the easy doors first and then get to the hard door and realize you can't finished your project or you under estimated the true difficulty of what you were doing. In saying this I'm explicitly stating the Driver's door is by far the hardest of the doors. If you can do that door, literally half the work is done and you can follow with the easier doors
Read more: How To Keep LED Strips From Falling Off?
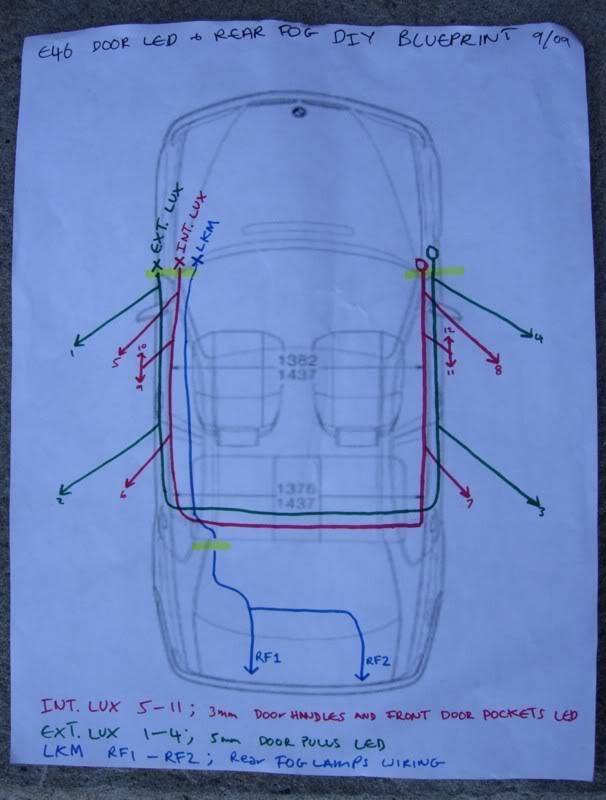
2. Give yourself lots of time to do this DIY. Make sure you really want this, because you do not want to be standing at midnight in front of your car with the door panels off, battery unplugged, spools of wiring around your feet and 20 screws and bolts in your pockets wondering what the hell possessed you to do this. Start with a blueprint and outline for how you will do it. For me it was laying the main wire branches first then going door to door tapping into the branch as I reached each door. For you it could be drilling holes in the handles first then placing the LEDs bulbs and wiring in all the doors before passing the wiring thru to the car and finding tap in points.
3. Get lots of wires and all the tools you need before. A flat/skinny ratchet tool is a must for the door jamb wire harness rubber connector tubes. A couple of Slurpie straws and plastic skewer made this DIY a lot easier.
Read more: How to Fix Led Strip Lights Different Colors
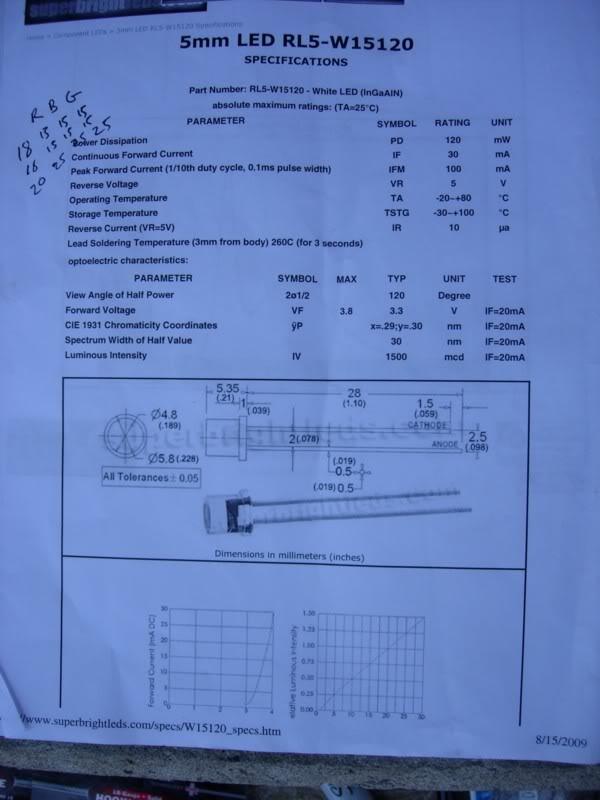
4. Pre-wired LEDs with Retainers also makes this DIY easier. Get your LEDs pre-wired with retainers. I bought mine on eBay from a USA/Michigan based seller for $6.99 for a set of 10 bulb and the corresponding retainers were 99 cents for a set of 10
DIY PROLOGUE:
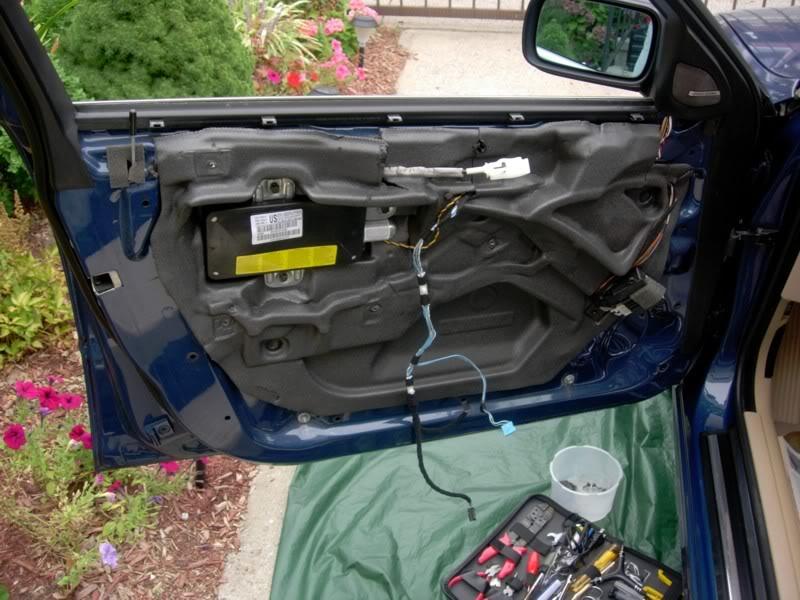
I began by rolling the windows all the way down and removing my door panel, unclipping the inside door handle latch cable-thingy, unplugging the speakers and setting the door panel aside. At this stage I didn't really find any "technical" need to unplug the battery because removal of the airbag is not required but I did anyway just to be sure the thing didn't explode on me. I realized later on when I removed the door rubber connector tube and I needed to unplug the door harness (w/ the airbag wiring) the battery did indeed have to be unplugged beforehand to avoid any airbag light errors.
Next I removed the steering wheel's lower black panel and driver side footrest panel. The black panel came off easily but the footrest panel took a while to figure out. The Haynes manual sort of hints that the door sill needs to come off before this panel as it overlap it. And indeed the door sill overlaps both the footrest panel as well as the B pillar base-(which you will have to remove eventually).
The door sill is a beeyotch to remove. The clips are heavy duty and I found the ONLY way was using my bare hands to grip the inside edge and squatting using all my arm and leg power to pull it off. The middle clip of the sill trim came loose before the edges. And when the sill came off I never even budged the outer clips, instead I broke the sill's clip holder groove on the underside where the outer clips connect to the sill trim. Not bad because the trim will still go back on as the groove that holds the clips isn't completely damaged and more than one clip in point holds it in place. Also in future the sill should come off easier but I probably won't need to remove it once I'm done as I'm laying down all my wiring for the door LEDs, rear fog, and PDC onetime at the same time.
As soon as the sill comes off, the footrest trim panel will slide right out. Next I used an 8mm hex socket to remove the rubber connector head from the car side. I could barely fit my ratchet in there and lucky for me the bolt was not tight at all and I ended up using my finger and just the 8mm bit to unscrew the bolt. In future I need to pick up a smaller ratchet head to remove the rubber connector tubes on the other doors (I guessed not all the bolts were going to be as easy and I was right).I next removed the tail end of the tube from the door frame where it simply suctions over the hole that carries the wires into the door. Then I disassembled the wire harness head. UNPLUG THE BATTERY BEFORE DOING THIS as you are unplugging the airbag in the door when you cleave this harness and this can cause airbag warning lamp malfunction. It cleaves into two halves. Slide off the blue lower cover. Then pull up the top square bit simultaneously as you separate the halves. It is straight forward once you visually grasp what you need to do.
Read more: How to Remove and Reuse LED Strip Lights: Protect Your Walls!
I realized my LED wires fished easily thru from the foot well and out to the hole to the outside where the rubber connector joined the car. But I also eventually realize that was not the way to do it.
The next step took about 2 hrs figuring how to get the my LED wires from the door side thru (or around) the rubber tube and into the car.
First off, kudos to all those that got their wiring around the outside of the rubber tube. That way seemed more impossible to me as the rubber tube needs to be sealed flush against the holes in the door and car and any LED
wires not going into the tube will leave a nice gap where the tube seals against the holes (that will obviously and eventually let water in. When a tear or unglued section of the door's inner vapour barrier lets in tons of water I can't imagine what kind of flooding in your footwell a fully unsealed door tube would cause.).
So the ONLY way I could see of doing this was to get all my LED wires into and thru the rubber tube.
After two more hours of trail and error; I found that using a plastic skewer I could literally thread the 18 gauge wire thru the tube (one at a time) from the tail end towards the head.
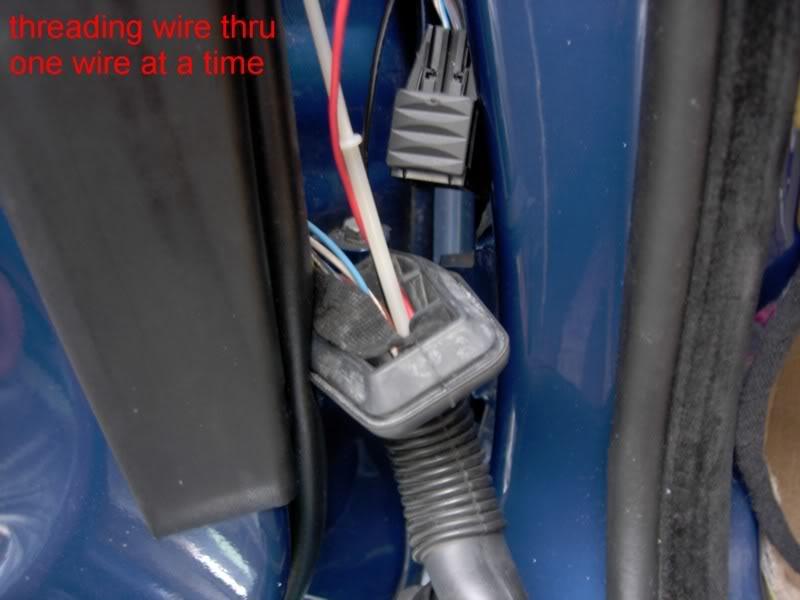
After getting the first 2 wires thru the tube gets real tight to thread anymore. So designated the 2 wires already inside the tube as guide wires that would each fish out 2 more wires (totaling all the 4 wires I needed to get thru) I heat shrink 2 wires to each guide wire already in the tube and pulled the new wire sets one at a time thru leaving all my 4 wires (one set for inner handle LED and the other set for outer handle LED) going thru the tube OEM style.
Read more: How to Connect Ksipze LED Lights to Phone